
Table of Contents
- Core Mushroom Lab Equipment: What You Actually Need
- Sterile Workspace: Laminar Flow Hood vs Still Air Box
- Sterilization Equipment: Best Pressure Cooker for Mushroom Spawn
- Culture Media and Containers for Mycelium Growth
- Incubation and Fruiting Chamber Environment Control
- Essential Tools for Inoculation and Culture Transfer
- Mycology Laboratory Safety Standards and Maintenance
- Build Your Setup: From Hobbyist to Professional
- Frequently Asked Questions
Last Updated: September 9, 2026
Core Mushroom Lab Equipment: What You Actually Need
Identifying mushroom growing lab equipment starts with a simple truth: you need far less than the glossy catalogs suggest. A functional home mycology lab rests on four pillars: a sterile workspace, a sterilization device, culture media, and environmental controls. Prioritize these core systems over gadgets, since contamination is the primary killer of new cultures.
The goal is to move from “buying things” to “building a system.” A common mistake is over-investing in a high-end microscope while neglecting a reliable sterilization cycle.
Sterile Workspace: Laminar Flow Hood vs Still Air Box
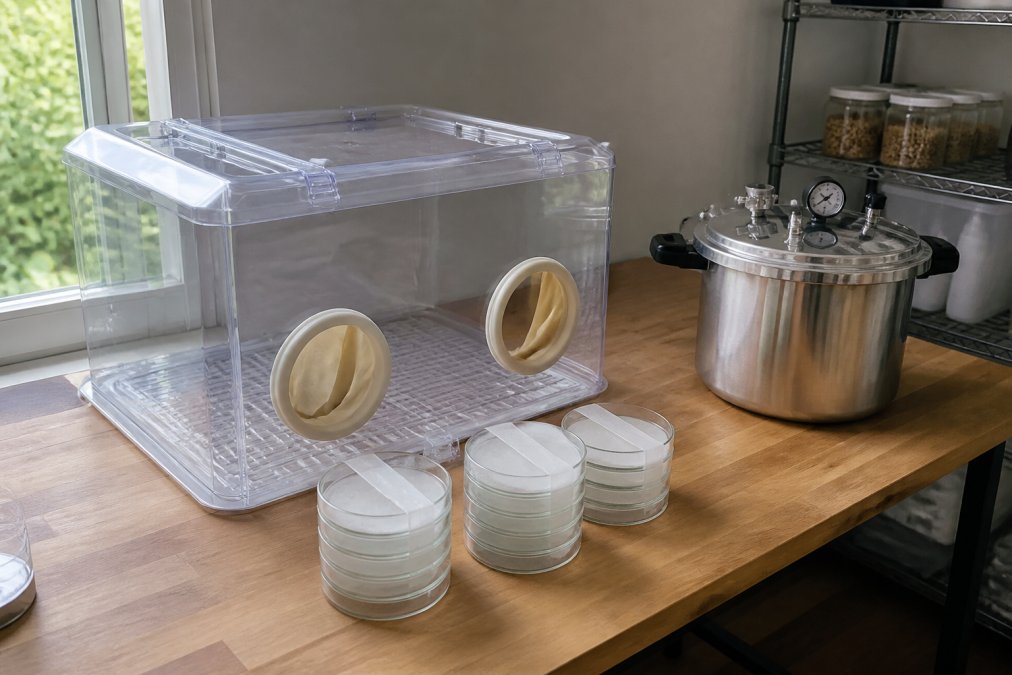
The choice between a laminar flow hood and a still air box is the first major fork in the road for identifying mushroom growing lab equipment. A laminar flow hood uses a HEPA filter to push a continuous, uniform column of sterile air over your work area. A still air box is a sealed, clear container with arm holes, relying on the absence of air currents to keep contaminants from settling.
For most hobbyists, a still air box is the most practical starting point: inexpensive, maintenance-free, and highly effective for agar work and grain transfers with proper sterile technique. A laminar flow hood is the professional standard, allowing faster work with lower contamination risk, but it requires space, significant investment, and regular HEPA filter replacement.
The most common failure with a still air box is rushing. Moving your hands in and out rapidly creates air turbulence that pulls contaminants inside. Work slowly, and let the air settle for 10 minutes after you seal the box.
Sterilization Equipment: Best Pressure Cooker for Mushroom Spawn
Sterilization is the backbone of any cultivation effort. While an autoclave is the lab-grade standard, a pressure cooker is the workhorse for most growers because it reaches the required temperatures at a fraction of the cost. The equipment must reliably reach 15 PSI at 121°C to kill heat-resistant endospores in grain and agar media (the CDC).
Pressure Cooker Types and Mechanisms
There are two main types of pressure cookers used by growers: stovetop models with a weighted rocker and stovetop models with a dial gauge. The rocker type is simpler and maintains pressure by releasing excess steam. The dial gauge type requires more attention because you must manually adjust the heat source to keep the pressure stable. For mushroom work, a dial gauge is often preferred because it allows you to monitor the exact pressure, but this advantage is nullified if the gauge is inaccurate.
The Calibration Gap: Why Your Gauge May Be Lying
Most guides tell you to buy a pressure cooker; almost none tell you how to verify it actually reaches 121°C. A dial gauge can drift by 2-3 PSI over a year of regular use, meaning your cooker might run at 112°C while the gauge reads 15 PSI (peer-reviewed research). At that temperature, endospores survive, and contamination appears days later.
To calibrate your gauge, you need a reference thermometer. A digital thermometer with a probe that can be inserted into the vent port is the most practical method:
- Place the probe in the vent port, ensuring it is sealed with a heat-resistant gasket or foil.
- Bring the cooker up to pressure and maintain a steady 15 PSI on the dial gauge.
- Wait 10 minutes for the temperature to stabilize.
- Read the thermometer. At 15 PSI, the temperature should read 121°C.
If the temperature is off by more than 1°C, your sterilization cycle is compromised. A common pattern is that the gauge reads high (e.g., shows 15 PSI but the temperature is only 115°C). Replacing a faulty gauge is more reliable than compensating, as gauges are relatively inexpensive compared to the cost of lost cultures.
Common Failure Modes and Troubleshooting
Beyond gauge drift, there are three common failure modes that lead to contamination:
- Slow pressure rise: If your cooker takes more than 30 minutes to reach 15 PSI, your heat source may be insufficient, or the gasket is leaking. Check the gasket for cracks and replace it if it is more than two years old.
- Pressure drop during the cycle: If the pressure fluctuates during the sterilization hold, you risk incomplete sterilization. This is often caused by an unstable heat source. A workaround is to use a portable butane burner that provides a constant flame.
- Condensation inside jars: After the cycle, rapid cooling can cause condensation to form inside your jars, which raises moisture content and invites bacterial growth. To mitigate this, let the pressure release naturally and allow the jars to cool slowly in the cooker before removing them.
Never force-cool a pressure cooker by running it under cold water. This can warp the metal, damage the gasket, and create a vacuum that pulls unsterile air into the jars through the filter discs. Always allow natural pressure release and slow cooling.
Maintenance Schedule for Longevity
A pressure cooker is a precision instrument, not a kitchen appliance. To keep it reliable:
- After every use: Clean the rim and gasket with warm soapy water. Ensure no food particles are trapped.
- Monthly: Inspect the gasket for cracks or deformation. Replace it if it no longer forms a tight seal.
- Annually: Calibrate the dial gauge against a reference thermometer. If you use your cooker more than twice a week, calibrate every six months.
- Check the vent port: Ensure it is clear of debris before each use. A blocked vent port is a safety hazard and will prevent proper pressure regulation.
Treating your pressure cooker as laboratory equipment requiring calibration and maintenance eliminates the most common variable in contamination outbreaks.
Culture Media and Containers for Mycelium Growth
Once you have sterile grain or agar media, you need the right containers to culture mycelium. Agar media in petri dishes is the standard for isolating clean cultures, while grain spawn in mason jars expands mycelium for inoculating substrates. Choosing glass over plastic whenever possible is key, since glass is reusable and autoclavable.
For petri dishes, polypropylene or glass options withstand repeated sterilization cycles. You will also need parafilm to seal the dishes, which allows gas exchange while preventing contaminants from entering. For grain spawn, standard mason jars with modified lids fitted with a synthetic filter disc or polyfill are the industry norm.
| Container Type | Best Use | Material | Key Feature |
|---|---|---|---|
| Petri Dish | Culture isolation | Glass or Polypropylene | Reusable, autoclavable |
| Mason Jar | Grain spawn | Glass | Filter disc lids for gas exchange |
| Culture Slants | Long-term storage | Glass test tubes | Refrigerated preservation |
Incubation and Fruiting Chamber Environment Control
Mycelial growth depends on stable environmental parameters. During incubation, grain spawn and agar cultures need a consistent temperature in the mid-20s Celsius and complete darkness. A simple digital thermometer with a probe is sufficient, but a temperature controller connected to a small space heater provides the needed precision.
For fruiting, the environment shifts to require fresh air exchange, high humidity, and specific light cycles. A fruiting chamber needs a hygrometer and a way to manage CO2 buildup. Many growers use a Martha-style tent with a humidifier and an exhaust fan on a timer. Fresh air exchange and humidity are a balancing act; too much ventilation dries out fruiting blocks, while too little causes CO2 accumulation and abnormal growth.
You do not need an expensive CO2 monitor to start. If your mushrooms are growing tall and thin with small caps, that is a classic sign of high CO2 levels from insufficient fresh air exchange. Adjust your fan timer before buying more monitoring equipment.
Essential Tools for Inoculation and Culture Transfer
Precision tools enable you to perform sterile technique effectively. The core kit includes an inoculation loop, a scalpel for cutting agar, and a flame source such as an alcohol lamp or butane torch for sterilizing tools between transfers. Isopropyl alcohol at 70% concentration is the standard disinfectant for surfaces and gloves.
A common mistake is neglecting the sterilization of the loop between multiple transfers. You must heat the metal loop to red-hot and allow it to cool for 10-15 seconds before touching your culture, otherwise you will kill the mycelium. For those scaling up, a set of biopsy punches is a professional upgrade, allowing you to cut uniform agar plugs from a master culture with minimal disturbance.
Mycology Laboratory Safety Standards and Maintenance
Working with fungal cultures requires attention to safety, particularly regarding airborne spores and equipment maintenance. While most gourmet species are safe to handle, you should always work in a well-ventilated area and consider a respirator with P100 filters if you are working with large quantities of dry grain spawn or harvesting heavy spore producers. Canada’s food safety guidance, outlined by the Canadian Food Inspection Agency, emphasizes that equipment used for food production must be cleanable and maintained to prevent contamination.
Maintenance is the most overlooked aspect of identifying mushroom growing lab equipment. HEPA filters have a finite lifespan and must be replaced when airflow drops. Pressure cooker gauges need annual calibration checks. Your still air box should be wiped down with isopropyl alcohol before every use. A logbook tracking sterilization cycles and contamination rates is the single best tool for diagnosing recurring issues.
Skipping regular calibration of your pressure cooker gauge is a silent killer. If the gauge reads 15 PSI but the actual temperature is only 115°C, you are not sterilizing, you are just boiling. This leads to contamination that appears days later, wasting all your grain and cultures.
Build Your Setup: From Hobbyist to Professional
Identifying mushroom growing lab equipment is ultimately a scaling exercise. But the transition from hobbyist to professional is rarely linear, and most guides fail to address the most common reason growers stall: they upgrade equipment without upgrading their diagnostic skills.
Growth Stage Equipment Matrix
The decision to upgrade should be driven by failure points, not by desire. Here is a practical framework based on where your process breaks down:
| Growth Stage | Core Limitation | Recommended Upgrade | Trigger for Upgrade |
|---|---|---|---|
| Stage 1: Learning | Contamination rate above 20% | Master sterile technique in a still air box | You can run 10 consecutive jars with zero contamination |
| Stage 2: Consistent Hobbyist | Throughput is too slow | Add a second pressure cooker or larger model | You are spending more than 4 hours per week on sterilization |
| Stage 3: Semi-Pro | Still air box is ergonomically limiting | Purchase a laminar flow hood | You are doing more than 50 agar transfers per session |
| Stage 4: Commercial | Environmental control is inconsistent | Automate fruiting chamber with sensors and controllers | You are losing more than 10% of your harvest to environmental fluctuations |
Troubleshooting Equipment Failure: A Diagnostic Approach
When contamination rates spike or mycelium growth stalls, the instinct is to overhaul your entire setup. This is almost always a mistake. Isolate variables and test one hypothesis at a time.
Scenario 1: Contamination appears in grain jars after 5-7 days.
This is the most common failure pattern. The contamination is bacterial (often Bacillus spp.) and indicates that the sterilization cycle was insufficient. Before changing anything else, verify your pressure cooker calibration. If the gauge is accurate, check your cooling process. If both are fine, test your grain preparation. Grain that is too wet will harbor bacteria even after a proper sterilization cycle. A simple test: after sterilization, the grain should be firm and separate, not mushy or clumped.
Scenario 2: Contamination appears at the inoculation point.
If contamination is localized where you injected your liquid culture or placed your agar wedge, the problem is your sterile technique, not your equipment. This points to a contaminated culture or a failure to flame-sterilize your tools between transfers. Check your culture on agar first. If the culture is clean, the issue is your transfer technique.
Scenario 3: Mycelium grows but stalls before full colonization.
This is rarely an equipment failure. It is usually an environmental issue. Check your incubation temperature with a second thermometer, do not trust a single reading. If the temperature is stable, the issue may be gas exchange. Your filter discs may be clogged with moisture, preventing oxygen from reaching the mycelium. Replace the filter discs and try again.
The Hidden Cost of Downtime
For growers scaling up, the cost of equipment failure is not just lost materials, it is lost time. A single contaminated batch of 20 jars represents 2-3 weeks of incubation time lost. Over a year, this can mean the difference between 10 harvests and 6 harvests. Maintenance is a productivity strategy.
Build a simple maintenance log. For each sterilization cycle, record the date, the pressure, the duration, and the batch number. When contamination occurs, you can trace it back to a specific cycle and identify whether the issue was equipment-related or technique-related. This single habit will save you more time and money than any equipment upgrade.
When to Invest in Professional Equipment
The jump from a still air box to a laminar flow hood is justified when your contamination rate is below 5% but throughput is limited by ergonomics. The jump from a pressure cooker to an autoclave is justified when sterilizing more than 50 jars per week and cycle time becomes a bottleneck. The jump to automated sensors is justified when losing harvests to humidity or CO2 fluctuations.
Professional equipment does not solve technique problems; it solves throughput and consistency problems. If contamination rates remain above 10%, a $2,000 flow hood will not fix the issue, you will simply contaminate more cultures faster. Master the fundamentals first, then scale.
Frequently Asked Questions
What is the most essential piece of mushroom lab equipment for a beginner?
For a beginner, a pressure cooker is the most essential piece of mushroom lab equipment. It sterilizes your grain spawn, substrate, and agar media, which is the foundation of contamination control. Without proper sterilization, even the best laminar flow hood won’t save your cultures from bacteria and mold. A standard 23-quart model is a solid starting point for home cultivation.
How do I choose between a laminar flow hood and a still air box?
A still air box is a cheap, enclosed container with arm holes that minimizes air movement. It is effective for simple tasks like agar work and inoculation when used carefully. A laminar flow hood uses a HEPA filter to push sterile air over your workspace, offering far more protection and ease of use. Choose a still air box to start, but upgrade to a laminar flow hood as your operation grows.
Can a regular pressure cooker sterilize mushroom spawn effectively?
Yes, a standard pressure cooker is effective for sterilizing mushroom spawn, provided it can maintain 15 PSI. This pressure is necessary to reach a temperature of 121°C, which kills heat-resistant contaminants. A smaller 23-quart model works for home growers, while larger operations may prefer an autoclave, which offers more capacity and automated sterilization cycles.
What safety equipment is required for a sterile mushroom laboratory?
Personal protective equipment (PPE) is a key part of mycology laboratory safety standards. This includes nitrile gloves, a lab coat or dedicated clothing, and a face mask. You should also use 70% isopropyl alcohol to disinfect surfaces and your gloves. For working with dry substrates, a respirator with particulate filters is recommended to avoid inhaling spores and dust.
How can I identify high-quality agar plates for mycology work?
Look for pre-sterilized, vented petri dishes made from food-grade polystyrene. Vents allow for gas exchange while preventing contamination. The plates should be clear to allow for easy observation of mycelial growth. You can buy them pre-poured or prepare your own with agar media. High-quality plates are uniform and free from cracks or defects to maintain a sterile environment.
What is the difference between grain spawn and a fruiting chamber?
Grain spawn is a sterile substrate, like rye or millet, that has been inoculated with mycelium culture. It is used to expand your culture and inoculate bulk substrates. A fruiting chamber is the environment where you introduce the colonized substrate to conditions that trigger mushroom formation. This chamber requires high humidity and fresh air exchange, but no sterile technique.